Installation Guide for Attaching your Acoustic Pickguard
CAUTION! - DO NOT BEND, THIS IS WOOD, NOT PLASTIC, AND COULD CRACK!
PLEASE READ FIRST BEFORE MOUNTING!
Thank you for purchasing a ThinWood pickguard! Please make a note of the following cautions:
1. Before mounting, the pickguard is fragile and should be handled with care. Once it is mounted, it is durable and resilient to wear and tear. But in the meantime, avoid bending or twisting as it will likely crack or break.
2. The peel and stick adhesive is very sticky. Once it makes contact with a surface it can be difficult to un-stick without damaging the pickguard.
If you follow these instructions, you can successfully mount it to your guitar and enjoy its beautiful protection without the frustrating experience of accidentally breaking it.
As the one fabricating these pickguards, I can't tell you how many I've broken from lack of caution or rushing the process.
Handling
I strongly advise handling the pickgard from the edges after removing it from the cardboard and wax paper packaging. Do not peel the adhesive backing yet!
Dry Run
Before removing the peel and stick backing from the pickguard, place it in the exact location on the guitar. This is a dry run, after which you will place a few tape markers to help alignment in the final mounting.
Tan Line
If you are covering a 'tan line', position the pickguard carefully to cover the lighter areas of wood that had previously been covered by the original pickguard.
Rosette line
Pay close attention to the alignment of the pickguard rosette cut with the rosette ring of your guitar. Using this has your main reference, you can shift the pickguard left or right along the rosette line to position it perfectly to cover the tan line.
If your guitar is new and there is no tan line, you can find the location that looks the best to you, keeping the curved rosette cut on the rosette line.
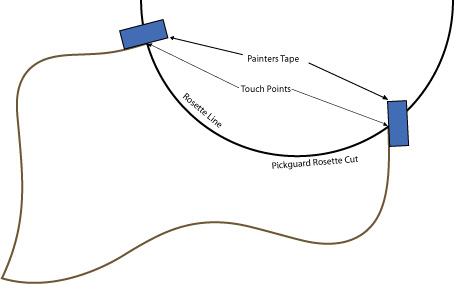
Final position
Once you have established the perfect location for your ThinWood pickguard, tear off a few small pieces of masking tape and place them along the edge of the pickguard where the points meet the rosette. Please look at the illustration for clarity.
The Big Peel
Remove peel and stick backing paper, starting at one of the points.
This can be a little tricky but use your fingernail to catch the edge
of the paper. Once the peel is started, hold the pickguard by the
edges and peel the remainder free from the adhesive. Be gentle as
you don’t want to break the pickguard.
Touchdown
Finally, hold the pickguard with the points slightly tilted down
toward the ‘touch points’ shown in the illustration, making your
first contact precisely at the locations created by the tape and
the rosette. Once again, it’s sticky so the idea is to make as little
contact as possible until you are sure you’re in the right spot.
The Final Rub
Slowly tilt the guard down flat until the rosette cut meets the rosette
line and rub across the surface, working your way down the pickguard.
Congratulations!! You did it!